Wednesday, May 29, 2013

Recipe of the Moment: Butternut Squash and Spinach Gratin


I had to modify this recipe a bit because I used part of the butternut squash on something else, but definitely worth making, especially with more butternut squash.

Note: I sliced the Parmesan cheese instead of crumbling and it was perfect to bite into a fork full of food and find a large amount of cheese in there.

Bf's review: When you told me what you were making, I thought I was going to have to force it down and smile anyway, but this is actually amazing! I love it! I'm getting more.

Original recipe: here 

Ingredients 
about 3 cups butternut squash, sliced
about 3 cups spinach
5 tbsp butter
1 small yellow onion
3 garlic cloves, minced
1 cup heavy cream
about 1/2 cup parmesan cheese
salt
pepper
1/4 tsp nutmeg

Preparation 
Preheat oven to 400.

Boil spinach about 3-5 minutes. Drain.

Melt 3 tbsp butter over medium heat. Add garlic and onions and stir until soft, about 5 minutes.

In a separate bowl, combine onion and garlic with spinach. Add in salt, pepper, nutmeg, and cream. Stir.

Beginning and ending with squash, layer squash and spinach mixture in buttered pan. Sprinkle cheese on top.

Bake until squash is tender and filling is bubbling, about 20-30 minutes.

Monday, April 1, 2013

Review of the LadyComp

After my horrifying Mirena experience, I did not want to get on any kind of prescription medication. Because birth control is necessary, I opted for Fertility Awareness Method. You can read more about FAM here if you're unfamiliar with it, but basically it's knowing when you can get pregnant and when you can't and having sex accordingly. So yes, sex is put on a bit of a schedule, or at least, unprotected sex is put on a schedule, but I'd take that any day over the horrors of the side effects of medication.

FAM uses charting and basal body temperature readings, as well as secondary signs (and sometimes third signs!) such as your cervical fluid, and it can be very straight forward. But sometimes it isn't. When I was researching FAM to find out if it was right for me, I came across many forum postings from women who were nervous: "I had unprotected sex on this day, but I'm not sure when I ovulated. Could I be PREGNANT?!" 

I can't speak to the skill level of these women in using FAM. I just knew I didn't want to be one of them. In almost every forum, women suggested the LadyComp, BabyComp, or the Pearly to those who could afford it. While it wasn't easily affordable for me (though they do have payment plans), I coughed up the money and I am so happy I did.


What is it? 
The LadyComp is natural, hormonal free birth control. It's part thermometer, which you need to take your temperature, and part computer, which stores your temperature (and height, weight, age, etc) and compares it to hundreds of thousands of other women to determine if you're fertile or not.

Which one should I get?
The BabyComp is a device for women who are trying to get pregnant. It can even help you choose a sex, though it's not 100% reliable. It takes your temperature and tells you the best days to have sex in order to have a little bundle of joy.

The LadyComp is a birth control device. It takes your temperature and tells you which days not to have sex. The Pearly is a cheaper version of the LadyComp. The display isn't as large, and it doesn't keep as much of your information in it's database, but it essentially does the same thing.

If you get the LadyComp and decide you do want a baby (at some point), you can pay a fee and upgrade the software so your LadyComp because a BabyComp. Or you don't have to. Just have sex on the red days and a baby should appear 9 months later. ;-)


How much?
So I spent a lot of money on the LadyComp, and it made me a little sick to my stomach, even a month or so afterwards. Yes, it's an investment. Yes, I'll save money long term. Yes, I could have bought a used one on eBay or Craigslist to save money, but when you're unemployed, spending money at all seems like a bad idea.

If you can't come up with the money and you're interested, I encourage you to look into their payment plan or look around on the internet for a used one.

I bought a new one because I wanted the warranty. (No point in spending all that money if it breaks!)

How does it work?
A red light means don't have sex. Green means go for it. The first few months, I got a lot of yellow lights. And yellow means that the machine is still learning my body, and it's best to treat it as a red day. I wasn't totally pleased with the yellow lights (nor was my boyfriend), but because I was tracking my chart alongside the machine, I had a little better of an idea about when I could have sex (and also if the machine was working properly).

I found that the machine is very conservative (hence all the yellow lights) in figuring out my ovulation days. It's much better now - I rarely, if ever, get a yellow day. Currently, my red days start the day before my cervical fluid shows up, so it's exactly on point with that. It's also great at determining the day I'm ovulating and when I can start having sex again.

In fact, now I only track my charts for my doctors to reference.

The LadyComp stores information for the last 180 days in its database, but it doesn't organize it like a chart - it's just numbers.

Does it actually work?
The Lady Comp has a Pearl Index rating of .7, which means less than 1 out of 100 women who use this will get pregnant. To compare, the pill has a PI between .1-.9 and diaphragms have a PI of 1-3. So compared to other hormonal alternatives, it's about the same, if not better. Percentage wise, it's 99.3% accurate.

You can compare their devices to other, more standard birth control measures on their website.

I encourage you to poke around their website and give it a shot if you're interested.

Let me know if you have any questions!

Saturday, February 16, 2013

Recipe of the Moment: Chai Scones


Scones are not something I think of having all the time. Very rarely in fact. Maybe if I go out for afternoon tea at a restaurant or hotel, which happens less than once a year.

But no more!

I saw this simple recipe for Chai Spiced Scones over at Budget Bytes and decided to make them, and they're pretty tasty. I modified the spices just slightly because this recipe is pretty perfect on its own.

Because I don't typically eat scones, I'm not sure if this is normal or not, so I'm mentioning it anyway. On its own, it's a little dry. If I eat them with tea, my mouth sings. So. Don't forget the tea!


Ingredients
2 cups all purpose flour
3 tbsp sugar
1/2 tsp salt
2 tsp baking powder
1 tsp cinnamon
1/2 tsp ground ginger
1/2 tsp ground cloves
1/2 tsp ground cardamom
3 tbsp butter
1/4 cup milk
2 eggs
water

Preparation
Preheat the oven to 450.

In a large bowl, combine flour, sugar, salt, baking powder, cinnamon, ginger, cloves and cardamom.

Cut butter into chunks and with your hands, combine it with flour.

In a separate bowl, whisk together the eggs and milk. Pour the egg mixture into the flour mixture and stir.

If there is still a bit of dry flour, add water. I added about 2 tbps.

Shape the dough into a circular shape on a flat surface. Using a sharp knife, cut into 8 pieces.

Place the wedge shaped scones on a baking sheet and bake for 15-17 minutes, or until golden brown.

Enjoy with tea!

Thursday, February 14, 2013

Fertility Awareness Method: Reliable Birth Control Without Hormones

After my horrendous experience with hormonal birth control on the Mirena IUD, you can imagine I was not eager to get on another type of hormonal birth control. It turns out there aren't many options out there, except for condoms which I'm not a fan of. And except for FAM, Fertility Awareness Method.

FAM is something that not many people know about, even among doctors. A few people are generally familiar with the concept, but only because they used it to get pregnant. Yes, in addition to being birth control, it can also be a great way to conceive.

Very basically: FAM is a way for the woman to know her body and to know when she's ovulating. When you're not ovulating or not about to ovulate, you can have as much sex as you want. If you don't want to get pregnant, then you either abstain or use another method of birth control (i.e. condoms) when you are ovulating.

If you want to get pregnant, you make sure to have sex when you're ovulating since that's the only time you can get pregnant. Many couple erroneously think they're infertile when in fact they're just not having sex at the right time of the month.

FAM is NOT the rhythm method.
The rhythm method presupposes that every woman has a 28 day cycle and every woman ovulates on day 14. This is obviously not the case, as cycles can vary from month to month and especially from woman to woman. FAM looks at each month's cycle to determine when you're ovulating and when you're not.


How safe is this?
The bottom line is that no one's going to use it unless it works. And it does. If used correctly, it has almost the same effectiveness as the pill, 98%. Reasons for pregnancy/not correct use? Having sex during ovulation and not understanding the rules used to determine when you're fertile.

How does this work?
You need to know where you are in your cycle at all times. Luckily, your body lets you know, as long as you know how to read the signs.


First, you need to take your basal body temperature every day, which is your temperature before you get out of bed in the morning. Eventually, you will see a pattern emerge. The first half of your cycle, your temperature is lower. It drops to its lowest point on the day before you ovulate, and then for the rest of your cycle, temperatures are up. The temperature drops down again when you get your period, and the cycle starts over. (So yes, this is a great way to know the day you're going to get your period!)

Example of fertility chart

Secondly, you need to observe your cervical fluid. This confused me greatly at first, but now I'm a whiz at knowing what my cervical fluid means. Without cervical fluid, sperm die a quick and hopefully painless death.  Sperm need cervical fluid to transport them to the egg. So if you're using FAM as birth control, you need to be careful when you start to get fluid.

There are a few different types of fluid, and you only get fluid when you're about to ovulate or when you're ovulating. Some fluid is more "fertile" than others, but I tend to abstain when there's fluid at all because sperm can survive for up to 5 days when there's fluid and I don't want them hanging around, waiting for my "fertile" fluid to appear.

There are a few other methods, but these are the two that I find the most easy to track and the most reliable. Google FAM, or check out Planned Parenthood's page here for more information on other methods.

How much does it cost?
FAM can be very cheap. Really, all you need is a basal body thermometer, which you can pick up at a drugstore for less than $10. There are other options, which I'll discuss in a future post, that cost more, but doing this on the cheap is definitely possible.

Who should not use FAM?

FAM, while perfect for me, may not be for you. You have to have the discipline to take your temperature every day. You have to have the discipline to check your cervical fluid. You have to have the discipline not to have unprotected sex when you're not experiencing a "safe" day.

Beyond that, it's not recommended for non-monogamous couples due to STDs and HIV/AIDS risk. It's also not recommended for those who binge drink regularly, as it raises your basal body temperature and can cause confusion when charting.

While FAM works for those with irregular cycles, if your cycle is very irregular (i.e. more than 40 days or less than 20 days apart), it may not work for you.

Really, how easy is it? It sounds like a lot of work.
When I first started charting, I was confused. For the first week, I wasn't sure I was taking my temperature at the right time, correctly (I know, I know, but I was nervous), or if it was "immediately" after I had woken up. (What if I was awake thinking for a few moments before I realized I was awake?)

I was also a little confused by the cervical fluid and all the various types, but once I read Taking Charge of Your Fertility, I became much more confident on all fronts, and now I think it's breeze. It takes me less than 30 seconds a day to know where I am and what my body will (probably) do that day. I love it and I don't see myself going back on any hormonal birth control any time soon.

Want to learn more?
Generally I recommend talking to your doctor, but make sure your doctor knows about FAM before making an appointment.


Definitely check out the book Taking Charge of Your Fertility by Toni Weschler. Despite appearing like a pregnancy book, this is actually perfect for every woman to learn how her body functions. Despite thinking I knew a lot about my body, I found that my knowledge really only skimmed the surface. Things that always seemed crazy or disgusting suddenly made sense, and I no longer view my body as an unpredictable foreign being that's out to get me.

More importantly, it will teach you how to chart your cycles which will help you know when you're fertile and when you're not. If you are trying to conceive and having difficulties, you will hopefully be able to bypass many of the tests and drugs from the infertility doctor because you'll already know which phase of your cycle is causing the problems. Truly, it should be required reading for every female (and most men, as well!).

Wednesday, February 13, 2013

Recipe of the Moment: Quinoa and Cabbage Saute

Not the best picture, but I couldn't figure out how to make this look appetizing... even though it really is!
Continuing on making my way through Martha Stewart Living is this recipe! I have no idea what to call it. Martha calls it Toasted Quinoa Saute with Lemony Cabbage and Dill. She recommends serving it with yogurt, which really confuses me. My boyfriend calls it pasta salad, even though it really isn't, and thinks it would go great with a hamburger. I've settled on the name Quinoa and Cabbage Saute, even though I think that could still use some improvements.

Regardless of the confusion over what to make of this creation, I made some modifications, and it tastes amazing. I serve it warm; you can eat it cold, which my boyfriend does, but I prefer it heated.

Ingredients
1.5 cups of water
1/2 cup quinoa
1 head Savoy cabbage
2 tomatoes
1 cup feta cheese
1 15 ounce can chickpeas, drained and rinsed
1 cup small green olives, pitted
1 lemon, juiced
 salt
pepper
olive oil

Preparation
Bring water to a boil in a medium pot. Stir in quinoa and return to boil. Cover, reduce heat, and simmer for 15 minutes.

Uncover, turn heat to high and cook until water evaporates fully, stirring constantly, about 5 minutes.


Heat oil in a large skillet. Chop cabbage into small pieces.


Add half head of cabbage to the skillet and saute until tender and golden, about 8-10 minutes.


When one batch is finished, transfer to a bowl and continue with another batch of the cabbage.


Finally, add all cabbage and quinoa to the skillet and cook on high heat until the quinoa is toasted, about 10-15 minutes. Remove from heat and add to bowl.


In the bowl with the cabbage and quinoa, also add chickpeas, olives, tomatoes, cheese, and lemon juice and toss to combine. Salt and pepper to taste.

Enjoy!


Saturday, February 2, 2013

Recipe of the Moment: Winter Soup with Orange and Ginger


I somehow was lucky enough to receive Martha Stewart Living magazine for free for a year. I originally ordered it because I thought it might have a few ideas, but I'm shocked to report that each issue is full of great craft ideas, but more importantly, tasty recipes.

Or at least, recipes that look tasty because even though I've been subscribed for months, I've only ever bookmarked recipes and projects, but I decided this month I was going to start making my way through everything. After all, what's the point of the subscription if I never use it?

So first up is Martha's Root Vegetables soup, which I've modified a bit to reflect things I have on hand, as well as things I could actually find in stores. For example, there was no rutabaga in my local market, which is a shame because I absolutely love rutabaga. Maybe next time!

Ingredients
1 vidalia/sweet onion
2 parsnips, peeled and chopped
1 celery root, peeled and chopped
1 carrot, peeled and chopped
1 small butternut squash, peeled and chopped
2 red potaoes, chopped
1 tsp ground thyme
6 cups of water
1-2 oranges 
freshly grated ginger
salt
pepper
olive oil

Preparation
Heat oil in a large pot over medium heat. Add onion and cook until softened, about 4-7 minutes.


Add parnsips, celery root, carrot, butternut squash, potatoes, thyme, water, and salt and pepper to taste.


Bring to a boil, cover, and reduce heat. Simmer until vegetables are tender, 20-40 minutes.

Puree soup in a blender until smooth.

Separate each orange wedge from the other.

In each bowl: Squeeze one orange wedge's juice into the soup and stir. Use additional wedge, ginger, and salt and pepper as garnish. Enjoy!

Thursday, January 31, 2013

Indoor Composting 101: Setting Up Your Compost

Ready for your indoor worm bin? Maybe you read my introduction to composting, and you're ready to start. Maybe you've been interested for awhile and you're ready to make the plunge. Regardless, I'm going to help you set up your indoor compost today.

Supplies
Via
Worms - Not just any worms will do. Red worms, or red wigglers, are the breed to get, and you can find them online at certain vendors, like Amazon. Because there's always the chance they'll arrive dead (check those reviews!), I find it best to  find a supplier that's local. In NYC, the LES Ecology Center is great, and you can pick up worms several times a week at the Greenmarket in Union Square.

Deciding how many worms to get can be a challenge. What's recommended is this: Save your food scraps for a week, then weigh them. 1 pound of food scraps = 2 pounds of worms.

If you don't want to wait and weigh your food scraps for whatever reason, then I recommend you buy either a half pound or a pound of worms because the worms have a way of sorting themselves out. They will either reproduce if more are needed or they will die off if less are needed.

Storage Bin - There are quite a few different options for setting up your worm bin. If you search online, you'll find quite a few worms bins being sold that are specifically designed for composting. Below are a few different options, but I haven't used any of them, so be sure to check out the reviews.


A simpler and cheaper option would be to go to the dollar store, or whatever store you'd like, and buy a plastic storage bin. I bought one for a few dollars and poked holes in the top with a screwdriver. Et voila, a worm bin for less than $5. 

Make sure the worm bin is deep enough for air to circulate, and make sure it's large enough to hold the worms you purchase. To be precise, allow one square foot for each pound of scrap food per week.

Via
Bedding - Bedding is very important for the worms since they don't like light and being exposed. A few options: shredded newspaper, shredded computer paper, and shredded cardboard.

When starting the compost, I shred the newspaper by hand, then dip it water. I squeeze the excess water out, so it's just damp. Then I set the damp newspaper at the bottom of the worm bin. Easy!


Assembly
Once you've got your supplies, it's time to put everything together.

If you bought a plastic storage bin, be sure to poke enough holes in the top for the worms to breathe. 

Add worms on top of the damp bedding.
Add damp bedding to the empty plastic bin.

Dump your worms on top of the damp bedding. They will burrow their way underneath the bedding, where they will continue to live.

You can add some food scraps* right away, but usually the stressed worms will not be hungry. To add food scraps, chop the scraps as small as you can get them (I usually process them in a blender**) and bury the food scraps underneath the bedding. Never leave food scraps on top because that attracts flies and other pests.  

*Food scraps to add: fruit and vegetable peels or waste, coffee grounds, tea leaves, bread, egg shells, and spoiled food.
Food scraps to avoid: Dairy, meat, bones, human or animal waste, or anything non-biodegradable. 

**If you don't want to blend your food scraps, it will take much longer for the worms to digest and work through them.

Put the lid (with holes!) on the storage bin and place your indoor compost somewhere dark and moderately warm, between 55-77 degrees Fahrenheit. I usually keep mine in the pantry, but under the sink is also a great option.

That's it! 

Check on your worms periodically because it doesn't take long for them to die out if something happens. I'll have another article on troubleshooting tips soon, but generally it's pretty straightforward. 

Monday, January 28, 2013

Recipe of the Moment: Master Tonic

Have you managed to avoid getting the flu this year? While I've been lucky to avoid the "rampant epidemic" going around, I haven't been able to completely avoid getting ill. I was knocked out for about two days earlier this month with a fever, sore throat, and general achy-ness and tiredness. 

Why only two days? Because I made sure to make some Master Tonic before I got sick. Perhaps if I had taken it every day beforehand (as you're supposed to do), I wouldn't have gotten sick, but that's another story entirely...

I know with a name like Master Tonic, this concoction seems to conjure up memories from the early 20th century of a slick salesman trying to convince you that his snake oil will cure everything despite curing nothing, but amazingly the master tonic does work. I found the recipe on Heal Thyself, a great website that encourages healing our ailments through food.

Previously whenever I feel a cold start to come on, I would take raw garlic, or make garlic tea, and I do still stand by that. But this stuff is a little quicker to take (versus finding, chopping and consuming raw garlic) and has a few more ingredients for maximum health benefits.

The ingredients: apple cider vinegar, garlic, onions, ginger, horseradish root, cayenne peppers. Yes, this thing is spicy and one whiff will clean out your sinuses in no time. I'm sure you're generally aware that all of those ingredients are good for you, but I want to break it down, with help from Happy Mothering.

Apple cider vinegar: What doesn't ACV do? To its followers, it's pretty much a cure-all, though according to WebMD, ACV has only been shown to help diabetes, high cholesterol, blood pressure and general heart health, cancer, and weight loss.

Garlic: Kills the bad bacteria in your body, leaving the good bacteria. Also powerful antiviral, anti-parasitical   and antifungal.

Ginger: Antimicrobial. Boosts your immune system. Increases blood circulation. Great for nausea.

Onions: Diuretic, antibacterial, anti-inflammatory. Effective expectorant. 

Horseradish root: Antibacterial, anti-parasitic. Stimulates the immune system. Increases blood flow. Helps open the sinus passages.

Hot Peppers: Boosts immune system.Natural decongestant. Natural pain reliever.

Ingredients
1 part garlic
1 part ginger root
1 part white onions
1 part horseradish root
1 part hot peppers
apple cider vinegar

Preparation
Peel the horseradish root, ginger root, onions, and garlic.

Add horseradish root, ginger root, garlic, onions, and peppers to a blender or food processor and blend.

Add diced ingredients to a jar and pour enough apple cider vinegar to cover the top of the food bits.

Shake vigorously. 

Put in a dark spot and shake once a day for 2 weeks.

The tonic can be used before 2 weeks is up, and can sit longer than 2 weeks, but is generally accepted as "ready" after 2 weeks.

Strain the food bits out of the tonic. I like to save my food bits to add to soup, stock, tea, etc.

Notes
According to Heal Thyself, the proper dosage is 1/2 - 1 ounce, two or more times daily. I tend to take a tablespoon a day if I'm around sick people. If I'm sick myself, I take a tablespoon every 1-3 hours as needed. 

Effects of the tonic can be felt almost immediately, and I must warn you, this is nasty going down (unless you're really sick, in which case you can't taste it). Definitely have something ready to chase it with, but the effects are so great that it's worth the initial discomfort.

Saturday, January 26, 2013

Me and My Mirena IUD: From Love to Serious Hate

On paper, the IUD seemed perfect for me. I needed to control my cycle due to being diagnosed with endometriosis, a condition where the the lining of the womb grows in other areas of the body, with the result being pain, bruising, bleeding, and infertility. Because the easiest way to control endo is through halting the menstrual cycle, my doctor put me on the pill that gives me 4 periods a year. I've always been opposed to taking the pill due to some serious side effects, but since my options were the pill, early menopause, male hormones, or constantly being pregnant for the rest of my fertile life, the pill seemed the best way to go.
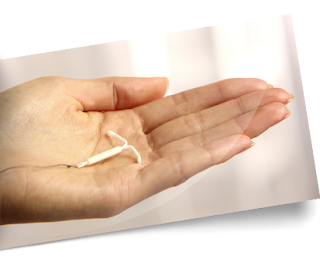
Via
So small and yet so dangerous.
After a few years, I lost my healthcare and couldn't afford the ridiculous amount of money required to get the generic Seasonique. The wonderful doctors at Planned Parenthood pointed out that every type of pill is designed the same way - it tricks your body into believing its pregnant - so technically I could take any type of pill and just skip the last week, the sugar pills.

It looked skipping the last week of the pill was going to be my best option, but then my doctor suggested an IUD, specifically one with hormones to suppress my period. On paper, it seemed perfect. It seemed to be the same hormone dosage I was getting from the brand of pill I was on, it was birth control for 5 years, and I wouldn't have to pick up and pay for a prescription and pills every few months.

I decided to go for it. For the first 10 months I absolutely loved it. I raved to everyone about the Mirena and couldn't figure out why everyone didn't get one. "They're common all around the world, just not this country," I would explain to anyone who would listen.

But then... then everything started to go wrong. At first, it started off small with a yeast infection. Yeast infections are completely normal, right? I had never had one before, so I went to the doctor just to verify that I was okay. My doctor was happy to reassure me and give me a prescription to knock out the infection.

Except the infection didn't go away. For 2 months. When I applied or took medicine, my symptoms went away, but the second I stopped the medicine it would come back. My doctors weren't concerned that it constantly re-occurred. They gave me unhelpful suggestions like stop wearing tight or damp underwear/clothing, stop douching, stop taking antibiotics, stop drinking, lower my sugar level intake, and add more vegetables to my diet. Technically, these are all things can cause a yeast infection to linger, but I couldn't make the changes because I was already doing them. I turned to more natural cures, like garlic, apple cider vinegar, and yogurt, but that didn't help either. Finally, after 2 months, it went away on it's own.

But it was immediately replaced with an even more painful bacterial infection.

For about a month, I tried the antibiotics the doctor gave me, then natural cures when the antibiotics failed (and my health insurance expired). The same thing happened as before: I was okay (not better) when taking medication, but the day after I stopped, it came back nastier than before.

That cleared up after a month, to be replaced my a UTI that hung around for 3 weeks. Identical story with the meds.

Eventually, that too cleared up as suddenly as it appeared. But was I suddenly better? Oh no, definitely not.

I started having severe pelvic pain. The worst were the cramps that would shoot up from my pelvic area to my chest and would strike randomly. 

I started getting really tired. I would sleep for about 12 hours a day, I felt incredibly nauseous, my stomach started to get bigger, I felt like I was about to burst, I had to use the bathroom constantly,  and I could hardly move. Walking to the end of the block was almost too much pain for me to handle. Finally I saw a doctor, who insisted on an ultrasound and blood work, fearing cancer.

Luckily, it wasn't cancer. Unluckily, it was a massive cyst on my ovary. It had completely flattened my bladder, and had taken over my pelvis area, pushing all of my other organs out of the way. Since I didn't have health insurance surgery was a last resort, and I was sent home and told not to move, unless the pain got much worse, in which case I needed to go straight to the emergency room.

I found some natural treatments for shrinking cysts, and I got myself on that immediately! Apple cider vinegar, blackstrap molasses, beets, castor oil, I tried everything. I also cut out all alcohol, caffeine, anything bad for me. And somehow it worked. My cyst disappeared 2 weeks later - I could tell because not only did the pain go away, but my stomach shrunk and I was able to fit into my clothes again. 

I could also walk! It was amazing because walking was something I had definitely taken for granted before.

For a few months, while I kept up my super healthy routine, I didn't develop anything new, though my pelvis and specifically my vaginal canal were still incredible painful. It felt raw to the touch, though the doctors claimed everything looked fine. 

Over time, I started to get a little lax and would introduce some take out to my diet. I would have a few drinks here and there. Coffee a few times a week. I always tried to be very careful to monitor my body to make sure cysts wouldn't come back.

Instead I got something much, much worse. Physically, the by now common complaints of vaginal pain were accompanied by breast pain. Putting on a bra became painful. And then the mental torture started. Paranoia. Anxiety. Depression. Thoughts of suicide.

I'm not talking about your "typical" thoughts of depression, paranoia, and anxiety, which, unfortunately, I've had before. This was worse than anything I've ever experienced. For example, I thought my mailman was trying to kill me. I wouldn't go into my bedroom because it overlooked the street and I thought people, working with my mailman, had set up surveillance and sniper rifles. I forced myself to leave the house a few times, once for a baby shower, and I had several panic attacks where I was hyperventilating and basically unable to function on the sidewalk. I don't even want to mention the suicidal thoughts I constantly rationalized.

I had other symptoms that may seem normal but were completely out of place for me: rashes, insomnia (which replaced the constant need to sleep), joint pain.

But you know what finally happened? I started to get very specific cramps that felt like it was originating from my uterus, from my IUD, and I googled some of my symptoms. Everything could be traced back to the Mirena.

EVERYTHING THAT HAPPENED TO ME CAN BE TRACED BACK TO THE MIRENA.

The list of side effects was not that long when I had it inserted, or if it was, it was lacking from my information packet, but it was all there on the Mirena website, with the exception of the rashes and joint pain, but I also attribute that to the Mirena because they went away when I had the Mirena removed.

EVERYTHING WENT AWAY WHEN I REMOVED THE MIRENA.

Well, almost everything. I still have some energy problems, but they've significantly improved in the 3 months that I've been Mirena free.

The worst part of this was that when I went to my doctor, I told her everything that happened to me. I told her all of my side effects and she told me that there was no way that the Mirena was to blame. She told me I had a yeast infection, a UTI, and probably suffered from vulvodynia; I would need to see a specialist. 

I insisted that I had none of those things, that it was the Mirena, so she did a few tests. I did not have a yeast infection or a UTI, despite still having symptoms. She was confused, and told me it could be part of the vulvodynia.

I told her my side effects were listed on Mirena's website, and thus, were caused by the Mirena. I wanted it out. She again defended the Mirena and told me it was against my best interest to remove it. However, I insisted, so she finally agreed, all the while telling me that I was making a terrible mistake and I would be back within a month to get another one.

You know what? I felt better within a few hours. 90% of my pain and side effects were gone within a week. 

I know the Mirena can do a lot of good for a lot of people. I was one of those people raving about it for the first 10 months it was in me. But the last 15 months it was in me were the worst 15 months of my life, physically and mentally, and I'm putting this up for those who are like me, whose doctors don't believe them, and they can't figure out what's wrong with their bodies. It can get better. Remove the Mirena if it's causing problems. Don't wait it out.

My doctor wanted to put me back on the pill when I removed the Mirena, and I took her prescription because I didn't want to start another disagreement (the previous being whether the Mirena was to blame or not), but I knew there was no way I was going back on more hormones after the horrors I had just experienced. 

Stay tuned for a follow up post regarding my current birth control.

My follow up post on the birth control I'm currently using can be found here.

Sunday, January 20, 2013

Recipe of the Moment: Grown Up Macaroni and Cheese

At what point does macaroni and cheese stop being macaroni and cheese and become a pasta dish? I've been thinking about that question a lot lately, especially because so many macaroni and cheese restaurants are popping up. As a purist, I tend to think that macaroni and cheese is strictly cheese sauce and cooked macaroni. But if you add some tomatoes or some tuna or bacon, does it become something else?  In the macaroni and cheese restaurants I sometimes visit, the answer is a resounding no, as they come up with some very clever and delicious results.

When Borders closed a little over a year ago, I was excited for all of the discount books. One of my lucky finds was the Whole Foods Diet Cookbook. The word diet through me off for a second, but the large "whole foods" drew me back in. Flipping through it, I was excited to see that the diet part of the book was a sales technique*, and it was, in fact, mostly whole foods and fit perfectly with my diet/lifestyle plan.

*I say sales technique because I believe the word was added to improve sales. Yes, you'll lose weight by eating healthy, whole foods, and the book explains how, but it's certainly not one of the gimmicky lose 10 pounds in 2 days type nonsense I'm used to seeing on the shelf.

In this cookbook, there's a recipe for macaroni and cheese that's healthy. Healthy because instead of adding several pounds of cheese to your meal, you'll instead puree beans and butternut squash, resulting in a "rich, creamy, and lusciously textured nutrient-rich puree that blends perfectly with the sharp cheddar (which you won't need much of thanks to the butternut squash puree acting as a flavor booster and filler too)."

I've made the recipe as they wrote it, and it was great, but last night I went a little crazy after I discovered I was out of milk and added all sorts of wonderful ingredients to make this a healthy alternative to many of the macaroni and cheese dishes out there.


Pretty it may not be, but I assure you it tastes amazing.

Ingredients
2 cups canned cannellini beans
1 cup chopped butternut squash
2/3 cups cream cheese
3/4 cup water
1 small onion, diced
4-5 garlic cloves, diced
1 cup sun dried tomatoes, chopped
2 cups shiitake mushrooms, diced
1 tsp ground thyme
1 tsp cayenne pepper
1 tbsp Worcestershire sauce
1 tbsp flour
1 cup shredded cheddar cheese
3 cups cooked pasta
1/2 cup parmesan cheese
1/4 cup flax meal
olive oil
salt
pepper

Preparation
Preheat oven to 400 degrees.

Place cannellini beans, butternut squash, cream cheese, and water in a blender. Puree until smooth. Set aside.

In a large skillet, heat oil  over medium heat. Add onion and saute for 3-4 minutes. Add garlic and tomatoes and saute for 2-3 minutes. Add mushrooms and saute until onions are soft, an additional 1-2 minutes.

When onions are soft add thyme, cayenne pepper, salt, and pepper.

Add flour to vegetables and stir quickly, making sure to coat all the vegetables.

Pour the bean and butternut squash mixture into the skillet and stir until well combined.

Add cheddar cheese and Worcestershire sauce.

Once the cheese has melted, add the cooked pasta.

Oil an 8x8-inch casserole dish and transfer the macaroni and cheese to the dish.

In a small bowl, mix together 1-2 tbsps of olive oil, flax meal, and parmesan cheese. Sprinkle the topping over the pasta mixture.

Bake uncovered for 10 minutes.

Allow to cool for 10 minutes before serving. Enjoy!

Thursday, January 17, 2013

Chemerical: Welcome to a Toxic Free World!


Now streaming on Netflix is Chemerical, a movie exploring all of the different chemicals and toxins that we encounter daily, going beyond the chemicals and pesticides found in food, and pointing out the problems in our household cleaners and personal care products. Chemerical, a combination of the words chemical, America, and miracle, is the perfect opportunity for viewers to examine their own lives and see what healthy changes they can make.

It gives some scary statistics; for example, stay at home moms are 50 times more likely to develop cancer compared to women who work outside the home due to constant exposure to toxic based chemical cleaners and pesticides. And air quality is 10-50 times worse INSIDE our home than outside.

The movie follows the Goode family as they go step by step to change their habits. The Goodes are a typical couple, with 3 children, the youngest having the most health problems. They agree to make a lifestyle change. At first, they get rid of their regular household cleaners and replace them with green cleaners, which is difficult enough for them. They even hide their old cleaners in the garage and sneak out to use them sporadically.

CHEMERICAL
The documentary looks at the chemicals and toxins in many products we surround ourselves with, the businesses behind many of the greener options on the market, and most pleasing to me, they looked at how we can make our own version of the products, including make-up!

This documentary hit pretty close to home for me because I started giving up many toxic chemicals about a year ago.

I've been fairly health conscious the last 3 years and I've actively tried to avoid chemicals, preservatives, and pesticides in my food. One day in my shower, I was looking at the long list of ingredients in my shampoo bottle, some of which I already knew were really bad for me, and I was wondering why I continued to use something I knew was unhealthy.

Skin absorbs much of what it comes into contact with so no matter how careful I was to avoid toxic materials in food, it didn't matter because I was still coming into contact with them elsewhere.

Over the last year, I've stopped using traditional household cleaners, shampoo, soap, toothpaste, deodorant, lotion, laundry detergent, and dish soap. Instead of buying pricier "green" products that could still have unhealthy ingredients, I make my own and it's ridiculously simple and cheap. I was so glad the documentary looked at that option because so many people think it's time consuming or expensive to whip up a batch of toothpaste, for example, but it's very simple.

Make-up is something I haven't yet looked into. I know there are some alternatives out there, but I've been too nervous to try a batch due to mediocre reviews. The film touched on how easy it is to create make-up, and I'm definitely going to give that a try in the next few weeks. The film also linked to Cosmetic Database, a website where you can see how toxic your products actually are.

My mascara is fairly good; it scored a 3 out of 10 for danger of toxicity. My foundation was a little worse, at 6 out of 10. But my perfume, which thankfully I don't wear frequently, scored the worst at 9 out of 10.

Looks like it's finally time to make a change with my cosmetics!

Monday, December 31, 2012

How I Overcame My Compulsive Overeating

This holiday season, I was lucky enough to spend quite a bit of time with friends and family, especially  family I don't normally get to see due to them living far away from civilization.

There was one trend that I noticed that popped up either from people describing themselves or others close to them and that was compulsive overeating. I'm sure there are men out there who describe themselves this way, but I don't know any so this post is going to focus on women. Specifically women who describe themselves as compulsive overeaters. Or, women in general, as every woman I know, myself included, describes themselves as a compulsive overeater.


For those unaware, a compulsive overeater is someone who cannot control what they eat, eating past the point of being full, eating when they aren't hungry, and also typically eating when they're emotional (depressed, upset, etc). Additionally, they tend to graze on food all day and eat very rapidly.

I mentioned that I have this problem. I am not overweight, though I used to be heavier, and it's something I struggle with frequently.


My boyfriend is frequently shocked at the amount of food I can consume, especially because I'm much smaller than he is. Most men I know are baffled because they simply say, "Just put the food down. What's the problem?" I typically explain compulsive overeating as a societal thing.

Food is a taboo product for women.

Let me explain. Women are told, explicitly or not, that our only redeeming factor is our looks. Yes, we can bring other things to the table. If we're good with our hands, great mothers, great thinkers, etc, then that's great. But how do we look while doing it?

If you watch an awards show or really anything Holloywood produces, women are expected to be as skinny and as beautiful as they possibly can be, regardless of age or role. Perhaps they bring it on themselves for working in a superficial environment, as it's often said, but using women as objects in Hollywood and the media affects women everywhere.


If you watch the news, women are still expected to be skinny and beautiful. First Lady Michelle Obama made the news when she ate a hamburger. Secretary of State Hillary Clinton is asked who does her hair. Supreme Court Justice Elena Kagan is criticized for being ugly and is sometimes referred to as an "it." 

Hopefully you don't read internet comments, because those are far, far worse. Quickly browsing through men's rights forums will make you want to shrivel up and die to stop the horror. 

(Not linking  to any of this due to terrible thoughts that no one should ever have to see, let alone championed.)

Now whether or not you internalize this and obsess about your looks or not, it's still there, everywhere you turn.

This affects our relationship with food. We're told not to eat it because it'll make us fat and undesirable. We're told that if we DO eat, we need to order the salad. We're made fun of for anything else. We're told if we do put on weight, no one will want us. We'll be lonely cat ladies who will probably go crazy.

So what do we do? We order the salad with vinaigrette dressing, not because we want to, but because we have to, and we plan out what we're going to eat at home. In secret.

Where we can eat ALL of it without any hassles from anyone.

When binge eating, your brain is happy. Really happy. For a short time. Then you start to get full. You ignore those signals and keep eating because there aren't real ingredients in food so you keep eating, hoping to recapture those euphoric first few bites, but you can't quite get there. Then you start to feel guilty for eating. Ashamed. Sometimes you start to admonish yourself in your head. Sometimes you take it out on yourself physically.

It's not pretty. And it's something we all struggle with.

So how do you overcome the compulsion and ultimately stop overeating? 

At my worst, I was about 40 pounds heavier than I am today. I hid food from my roommate, and I couldn't wait until she left so I could eat all of it. Sure, I'd go to bed with a stomachache, but I enjoyed the chemical sensations I got from eating my favorite foods.

Originally I tried therapy, which only got me motivated enough to get to the gym. The gym didn't help bring my weight down even though I was there for at least an hour, frequently 2 hours, and 3-5 days a week.

To go along with my gym routine, I restricted my calories. I tracked everything I ate and stopped at 1200 calories. 


How much weight did I lose? ZERO POUNDS.

To say I was frustrated after 6 months was an understatement. I was trying all sorts of tricks: upping my protein, upping my weights, adding more cardio- I even tried help in pill and powder form from popular  OTC supplements. Nothing helped.

The only, only thing that I've ever found that helped me lose weight AND stop the compulsive overeating was eating natural, processed foods.

I gave up all my stupid, ineffective dieting tricks. I stopped counting my calories. I stopped taking supplements. I even stopped going to the gym and working out (except for walking).


I wanted to be healthy, and I knew that what I was doing wasn't healthy. I switched over to an all natural, mostly plant diet, and everything changed. It wasn't overnight, it took about a month. Luckily I had the willpower for just that long.

I can now cook whatever I want, as long as it comes from vegetables, fruits, or meats, and eat a healthy amount. I don't overeat anymore. My portion sizes are smaller, not because I restrict myself, but because my body has a much easier time knowing when to stop. And I'm okay with it - there's no conflicting urge from my brain telling me to keep going. I also don't get that terrible full, bloated feeling like I used to get after every meal.

I'm sure you're skeptical. If you haven't switched over to a natural diet and you're still eating processed foods, it doesn't sound real. But this is how I know that it is:

When I eat processed foods, instantly I'm back to my old compulsive, overeating self.

I'm not sure if it's one of the chemicals added to hook my brain or if it's something else, but if my boyfriend comes home with a bag of Chex Mix, I eat the entire thing the second it's opened and offered to me. And it's like that with anything processed. 

I can only control myself around whole, natural foods. So that's the only thing I now keep in the house. I also refuse to buy frozen or prepared foods for a similar reason. If I'm hungry, then I have to be hungry enough to cook. No easy meals for laziness or grazing allowed.

As a result, I'm generally much happier. As mentioned earlier, I'm 40 pounds lighter, and I don't get terrible stomachaches after each meal. Nor do I get the guilt and shame when I do eat out or have an extra slice of cake.

Is it easy? Of course not, or else we wouldn't have this problem.

I had to learn what vegetables were (Leeks? What are those?), learn how to cook, and learn how to make meals ahead of time based on my schedule. It took me about a month to get fully on board mentally. I was strict on myself for the first month and I only ate homecooked meals, made from pasture meats and fresh fruits and vegetables. I had to create entirely new and foreign habits for myself. But the happiness and healthiness are so worth it in the end.

What do you guys think? Any tips or tricks you've found that work?

Thursday, December 6, 2012

Indoor Composting: An Introduction

I have an indoor compost that I just LOVE. Getting past the ick factor of having worms in your house, I think they're perfect for anyone that eats natural foods and doesn't have a yard. This is part of a 3 part series on composting. Next up are building the worm bin and harvesting the worm bin.

My happy worm bin, residing in my pantry.
Despite my joyful feelings on my worm bin, I was actually terrified and mulled over the idea of getting one for months. I didn't know anyone with whom I could consult so it seemed scary. Plus, when you search for info on the internet, many caution you against composting indoors. The best are outside, or so they say. The only reassurance to be found was my sister telling me that everyone in France has one they keep in their kitchen. 


I have no data to back that up, but it did make me feel a little more confident.

Mostly, I think I was terrified of getting bugs. And not just any bugs, though flying bugs are scary, but cockroaches. I've lived in large cities for the last 5 years, and I've managed to avoid having cockroaches in all of my apartments. I certainly didn't want to invite them in now.

Luckily, cockroaches don't really come with worm bins. Fruit flies, sometimes. Cockroaches, no.

I had extensive talks with the Lower East Ecology Center and I also attended a free class at my local library on indoor worm bins before I felt confident to purchase a pound of worms. (The Lower East Side Ecology Center also has a fantastic pdf that gives lots of helpful hints on what goes into a bin and troubleshooting problems.)

And since then, it's been pretty easy! I did have one bout of fungus gnats for 2 days, but as freaked out as I was am by bugs, all it meant was the balance in the worm bin was off. I just needed to add more browns, and poof! The gnats were gone. (And don't worry, they don't get into any other food in the pantry. They're there because they like decomposing food so your grains or oil is the least of their concern.)

Are you thinking about an indoor compost? I highly recommend it!

Why should you have a worm bin?
  • It's fairly inexpensive. There is some cost upfront on the worms and the bin (I believe I paid $27 total), but maintaining it costs nothing.
  • It's easy. At most, I spend maybe 20 minutes a week attending to my worm bin, but that's only because I drop in coffee grounds and tea bags frequently.
  • Worm bins done correctly do NOT attract pests. If you should be unlucky and attract some, simply add more browns and the problem should go away.
  • Worm bins done correctly do NOT smell. The only thing I've ever smelled out of mine was a nice "earth" scent.
  • Over 30% of trash thrown out has organic material that can be composted. Instead of throwing out food scraps or rotten food you forgot to eat, you can recycle it by adding it to the worm bin. 
  • If you send organic material to a landfill instead of composting, air cannot get to the organic material so it creates methane, a harmful greenhouse gas. Compost at home, and it creates oxygen.
  • You'll have nutrient rich vermicompost for your garden, which saves money on fertilizer, improves plant growth and quality, reduces erosion and nutrient run-off, reduces the need for pesticides, and breaks down clay-based soils.
  • If you have children or enjoy such things yourself, it's a fascinating science project since you're creating a little habitat for worms and seeing how matter is broken down.
What goes in the worm bin?
There are two categories of things that can go in the worm bin: greens and browns. The greens are predominantly the food scraps, and the browns are the dry materials like newspapers. Some prefer a 50/50 mix of greens and browns, but I find a better ratio is 40/60, just slightly more browns than greens.

Greens:
Fruit and vegetable scraps
Egg shells
Tea leaves/Tea Bags

Browns:
Nuts and shells
Coffee Grounds and Filters
Shredded Cardboard
Shredded Newspaper
Lint from dryers or vacuum cleaners
Bread

I typically throw my fruit and vegetable scraps in a bin in the freezer (very helpful for preventing fruit flies from banana peels!) and then once a week or so, I'll blend everything in a blender. It helps everything decompose MUCH faster. The worms also love the pulp leftover when I juice.

There are a few foods that you're cautioned against: onions, garlic, and broccoli. Apparently they can stink when they're decomposing. I personally have not found them to be any problem, though I do blend them before adding to my worm bin.

What DOESN'T go in the bin?
Meat
Dairy
Pet Poop

All of those things cause the worm bin to smell and/or attract bugs or larger pests. So don't do it.

Hopefully you feel safe and secure now in bringing in hundreds of worms to your home to make your life easier and the environment just slightly better. The next post in this series will be about building a worm bin!

Wednesday, November 21, 2012

Recipe of the Moment: Pumpkin Pie

(Don't forget to enter my chocolate cookbook giveaway going on!)

Still looking for that last minute recipe to perfect your Thanksgiving this year?

Add pumpkin pie! I found this easy recipe last year, and I've been making it ever since. The boyfriend, who hates sweets in general, also devours it - clearly a winner. Unlike traditional pies, the crust topping is made of walnuts, cinnamon, and sugar - lots of crumbly goodness!


Ingredients
1 9" pie crust

Topping
1/2 cup walnuts
1/4 cup golden brown sugar
1/2 tsp ground cinnamon
pinch of salt

Filling
1 cup golden brown sugar
2 eggs
1/2 tsp sea salt
1/2 tsp ground cinnamon
1/2 tsp ground ginger
1/4 tsp ground cloves
1 can pure pumpkin puree
1 cup heavy whipping cream

Preparation
Preheat oven to 350.

For Topping:
Combine all ingredients in a processor or blender. Blend to fine crumbs.

For Filling
Stir brown sugar, eggs, salt, cinnamon, ginger, and cloves in a large bowl. Add pumpkin and cream and stir until well blended.

Pour filling into crust.

Bake until pie is firm, about 30 minutes.

Sprinkle topping over the pie. Reduce oven temperature to 325 and continue to bake until filling is set, about 15 minutes.

Cool completely before serving.

Enjoy!